作者:Adam Freeman
翻译:陈广
日期:2019-5-10
我在第 15 章所描述的一对多关系并非 Entity Framework Core 支持的唯一关系类型。本章,我将向您展示如何定义一对一以及多对多关系,并演示在使用这些关系时如何查询关联数据,并解释了如何在数据库中管理这些关系。表16-1为本章摘要。
表 16-1:本章摘要
| 问题 | 解决方案 | 清单 |
|---|---|---|
| 定义完全一对一关系 | 添加相互导航属性,并向依赖实体类添加外键属性 | 1-7 |
| 更新关联对象 | 单独处理关联对象,以确保正确添加和更新数据。 | 8-16 |
| 定义多对多 | 创建一个具有一对多的连接类 | 17-28 |
| 关系 | 两种关联数据类型上的关系 |
本章使用在第11章中创建并在此后的章节中修改的 DataApp 项目。为了准备本章,在 DataApp 文件夹中打开一个命令提示符并运行清单 16-1 所示的命令。
提示:如果您不想跟着构建示例项目,可以从本书的源代码存储库下载所有必需的文件,https://github.com/apress/pro-ef-core-2-for-asp.net-core-mvc。
清单 16-1:重置数据库
dotnet ef database drop --force --context EFDatabaseContext
dotnet ef database update --context EFDatabaseContext
这些命令删除并重建了用于存储Product对象的数据库,以及与之关联的Supplier、ContactDetails和ContactLocation对象,这确保了您在本章示例中获得正确的结果。
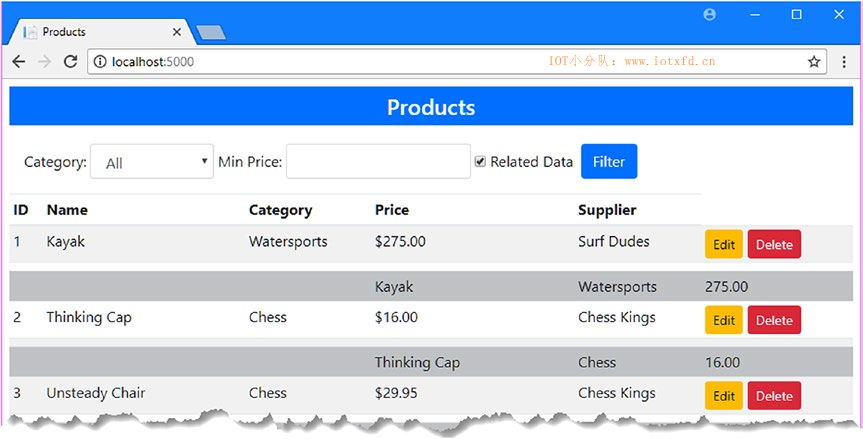
使用dotnet run启动应用程序,并使用浏览器导航至 http://localhost:5000。应用程序将在启动时播种数据库,您将看到如图 16-1 所示的产品列表。
在一对一的关系中,一种类型的对象与另一种类型的单个对象关联。完全一对一关系需要两个步骤,在下面的部分中,我解释了这两个步骤,我完成了Supplier和ContactDetails类之间的关系,这样每个Supplier对象都将与一个ContactDetails对象相关联。
第一步是定义导航属性。这与我在第14章中定义的属性相反,当时首先创建了Supplier和ContactDetails类之间的关系。当只定义一个导航属性时,Entity Framework Core 假设需要一对多的关系,只有定义了这两个导航属性,才能创建一对一的关系。在清单16-2中,我将导航属性添加到完全关系的ContactDetails类中。
清单 16-2:Models 文件夹下的 ContactDetails.cs 文件,添加一个属性
namespace DataApp.Models
{
    public class ContactDetails
    {
        public long Id { get; set; }
        public string Name { get; set; }
        public string Phone { get; set; }
        public ContactLocation Location { get; set; }
        public Supplier Supplier { get; set; }
    }
}
Supplier属性返回的是单个Supplier对象,而不是导航属性为一对多关系返回的IEnumerable<T>。导航属性的结果为单个对象告诉了 Entity Framework Core 这是一对一关系。当定义关系类型时,不考虑导航属性的名称。
第二步是决定关系中的哪个类是依赖实体(dependent entity),定在其上定义外键。Entity Framework Core 将对象作为行存储在数据库表中。当您在类间创建了关系,Entity Framework Core 将一个列添加到其中一个表中,并使用该列记录关联对象的主键值。外键列以及表中包含外键列的类被称为依赖实体,而另一个类(表中不包含外键列)被称为主要实体(principal entity)。
在一对多关系中,“多”那一端的类总是依赖实体,Entity Framework Core 总是知道外键列应该定义在哪边。但是在一对一关系中,两个类都可以依赖实体,而只有外键属性能给出 Entity Framework Core 所需的信息,以便将外键列放在数据库的正确位置。
对于本例,我将使ContactDetails类成为依赖实体,因此我按照第 14 章描述的约定定义了清单16-3所示的外键属性。
如何选择依赖实体类
在两个类间创建关系时,很难知道外键属性应该放在哪。那么请问自己一个问题:“
X类型对象是否可以在没有Y类型关联对象的情况下存在?”,如果回答是“是”,那么X为主要实体,则外键属性应当定义在依赖实体Y类中。如果回答为“不是”,则Y为主要实体,外键属性应当添加到依赖实体X中。在 DataApp 应用程序中应当这样提问:“Supplier是否可以在没有关联ContactDetails对象的情况下存在?”有时候,这个问题的答案是显而易见的,这样就可以很容易搞清楚外键属性应当放在哪。对于示例应用程序,产品供应商能够在没有联系人的情况下存在是有意义的,但相反的情况是没有意义的。这就是为什么我将
ContactDetails类设置为依赖实体的原因。然而,通常情况下,这并不明确,特别是在处理缺乏现实世界对应的抽象概念时。对于这些关系,您最好就是能做一个明智的猜测,看看应用程序是如何形成的。这并不理想,但处理数据并不总是那么容易,您可以通过移动外键属性,然后创建和应用新的迁移来纠正错误。
清单 16-3:Models 文件夹下的 ContactDetails.cs 文件,定义一个外键属性
namespace DataApp.Models
{
    public class ContactDetails
    {
        public long Id { get; set; }
        public string Name { get; set; }
        public string Phone { get; set; }
        public ContactLocation Location { get; set; }
        public long SupplierId { get; set; }
        public Supplier Supplier { get; set; }
    }
}
外键属性的类型决定一对一关系是必要的还是可选的。我在清单16-3中指定属性类型为long,它将创建一个必要关系,这意味着ContactDetails对象不能存储在数据库中,除非它与Supplier对象关联。如果我使用了可以设置为null的类型,例如long?,那么就会创建一个可选关系。
警告:始终使用外键属性完全关系。如果您没有在一对一的关系中指定外键属性,那么 Entity Framework Core 可能会尝试猜测哪个类是依赖实体,这可能导致意外的结果。
在创建了导航及外键属性之后,就可以创建迁移了。运行清单16-4所示的命令创建新的迁移,它将更改ContactDetails与Supplier对象之间的关系。
清单 16-4:为一对一关系创建迁移
dotnet ef migrations add CompleteOneToOne --context EFDatabaseContext
要理解关系的完全是如何改变数据库的,请打开 Migration 文件夹中创建的 <timestamp>_CompleteOneToOne.cs文件,并检查Up方法。
当只有导航属性时,Entity Framework Core 创建了一对多的关系,其中Supplier类是依赖实体。为了反映新的关系,迁移移除了现有的外键列,并在 ContactDetails 表上创建一个新列,从而使 ConactDetails 类成为依赖实体。为了反映这种一对一的关系,迁移包括以下声明:
...
migrationBuilder.CreateIndex(
    name: "IX_ContactDetails_SupplierId",
    table: "ContactDetails",
    column: "SupplierId",
    unique: true);
...
一对一关系是通过在外键列中创建一个需要唯一值的索引来表现的。这确保ConactDetails对象只能与单个Supplier对象关联。
提示:迁移不能应用于数据库,因为现有数据与迁移所施加的新约束相冲突。我将删除并重新创建数据库,以便在应用程序启动时重新加载数据库。
完全关系之后,通过一对一的关系对关联数据执行操作非常简单,如下部分所述。
在一对一关系中查询关联数据是一个简单的任务,因为您知道只有一个关联对象要处理。Include方法用于告诉 Entity Framework Core 跟随一个导航属性并在一对一关系中查询关联对象。您可以从关系两端的对象开始查询,在本章中,我将查询ConactDetails对象并导航到关联的Supplier对象。
为了演示如何处理一对一的关系,我在 Controllers 文件夹中添加了一个名为One2OneController.cs的类文件,并使用它来定义如清单16-5所示的控制器。
注意:正如在第11章中所解释的,我建议在实际项目中使用存储库,但我正在直接使用此控制器中的数据库 context 类,以避免每次演示不同的特性或操作时都进行三次更改(控制器、存储库接口和实现类)。
清单 16-5:Controllers 文件夹下的 One2OneController.cs 文件的内容
using DataApp.Models;
using Microsoft.AspNetCore.Mvc;
using Microsoft.EntityFrameworkCore;

namespace DataApp.Controllers
{
    public class One2OneController : Controller
    {
        private EFDatabaseContext context;
        public One2OneController(EFDatabaseContext ctx) => context = ctx;
        public IActionResult Index()
        {
            return View(context.Set<ContactDetails>().Include(cd => cd.Supplier));
        }
    }
}
控制器定义了一个名为Index的 action 方法,用于向数据库查询所有的ContactDetails对象和关联的Supplier对象,并将它们作为默认视图的视图模型。
为向用户显示数据,我创建了 Views/One2One 文件夹,并向其中添加了一个名为 Index.cshtml 的视图文件,内容如清单16-6所示。
清单 16-6:Views/One2One 文件夹下的 Index.cshtml 文件的内容
@model IEnumerable<DataApp.Models.ContactDetails>
@{
    ViewData["Title"] = "ContactDetails";
    Layout = "_Layout";
}

<table class="table table-striped table-sm">
    <tr>
        <th>ID</th>
        <th>Name</th>
        <th>Phone</th>
        <th></th>
        <th class="table-dark text-center" colspan="4">Supplier</th>
    </tr>
    @foreach (var s in Model)
    {
        <tr>
            <td>@s.Id</td>
            <td>@s.Name</td>
            <td>@s.Phone</td>
            <td>
                <form>
                    <button class="btn btn-sm btn-warning"
                            asp-action="Edit" asp-route-id="@s.Id">
                        Edit
                    </button>
                </form>
            </td>
            @if (s.Supplier != null)
            {
                <td class="table-dark">@s.Supplier.Id</td>
                <td class="table-dark">@s.Supplier.Name</td>
                <td class="table-dark">@s.Supplier.City</td>
                <td class="table-dark">@s.Supplier.State</td>
            }
            else
            {
                <td colspan="4" class="table-dark text-center">
                    No Related Supplier
                </td>
            }
        </tr>
    }
</table>
<a class="btn btn-primary" asp-action="Create">Create</a>
该视图创建了一个表用于每行显示一个ContactDetails对象及与其关联的Supplier。还有一些按钮和锚元素,它们以控制器上尚不存在的 action 方法为目标,但我将在后面的部分中使用这些元素演示不同的功能。
如果您试图应用在数据库中创建的迁移,由于其中已经包含的数据与迁移包含的更改相冲突,将得到一个错误。对于生产数据库,您需要花费时间迁移数据,但是对于开发项目,数据库可以删除并重新创建。在 DataApp 项目文件夹中运行清单16-7所示的命令,以删除数据库,并为一对一关系应用迁移。
清单 16-7:删除并重建数据库
dotnet ef database drop --force --context EFDatabaseContext
dotnet ef database update --context EFDatabaseContext
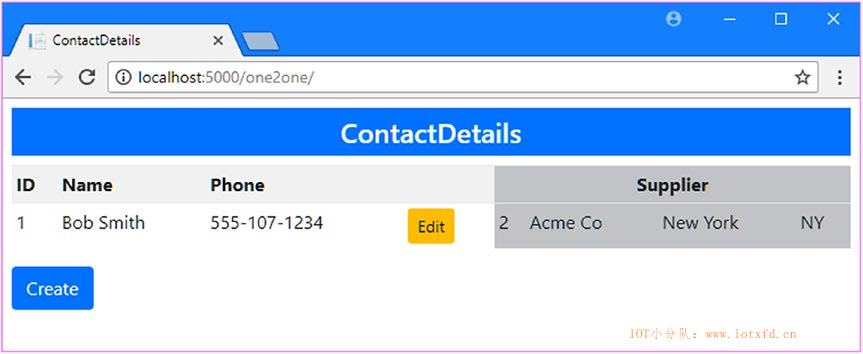
使用dotnet run启动应用程序,并导航至 http://localhost:5000/one2one。数据库将在应用程序启动时播种,所请求的 URL 将转至清单16-5中控制器定义的Index action 方法,从而选中清单16-6创建的视图并显示图16-2所示的结果。
您可以通过一对一关系中两端的导航属性创建和更新关联对象。例如,这意味着您可以通过ConactDetails对象的Supplier属性对Supplier对象进行操作,也可以通过Supplier对象的Contact属性对ConactDetails对象进行操作。在本节中,我将重点关注ConactDetails数据,因此我将清单16-8中所示的 action 方法添加到One2One控制器中,以处理编辑和创建过程。
清单 16-8:Controllers 文件夹下的 One2OneController.cs 文件,添加 action 方法
using DataApp.Models;
using Microsoft.AspNetCore.Mvc;
using Microsoft.EntityFrameworkCore;
using System.Linq;

namespace DataApp.Controllers
{
    public class One2OneController : Controller
    {
        private EFDatabaseContext context;
        public One2OneController(EFDatabaseContext ctx) => context = ctx;
        public IActionResult Index()
        {
            return View(context.Set<ContactDetails>().Include(cd => cd.Supplier));
        }
        public IActionResult Create() => View("ContactEditor");
        public IActionResult Edit(long id)
        {
            return View("ContactEditor",
                context.Set<ContactDetails>()
                    .Include(cd => cd.Supplier).First(cd => cd.Id == id));
        }
        [HttpPost]
        public IActionResult Update(ContactDetails details)
        {
            if (details.Id == 0)
            {
                context.Add<ContactDetails>(details);
            }
            else
            {
                context.Update<ContactDetails>(details);
            }
            context.SaveChanges();
            return RedirectToAction(nameof(Index));
        }
    }
}
这些 action 遵循前面章节中使用的相同模式。Create和Edit方法用于选择一个名为ContactEditor的视图,该视图将允许用户创建或修改一个对象,而EditContact方法使用存储库来查询用户所选择的对象。Update方法用于接收包含用户输入的数据的 POST 请求,并调用 Context 对象的Add或Update方法来更新数据库。
为了提供允许用户创建或编辑对象的视图,我在 Views/One2One 文件夹中创建了一个名为 ContactEditor.cshtml 的视图,并添加了清单16-9所示的元素。
清单 16-9:Views/One2One 文件夹下的 ContactEditor.cshtml 的内容
@model DataApp.Models.ContactDetails
@{
    ViewData["Title"] = Model == null ? "Create" : "Edit";
    Layout = "_Layout";
}

<form asp-action="Update" method="post">
    <input type="hidden" asp-for="Id" />
    <input type="hidden" asp-for="Supplier.Id" />
    <h4>Contact Details</h4>
    <div class="p-1 m-1">
        <div class="form-row">
            <div class="form-group col">
                <label asp-for="Name" class="form-control-label"></label>
                <input asp-for="Name" class="form-control" />
            </div>
            <div class="form-group col">
                <label asp-for="Phone" class="form-control-label"></label>
                <input asp-for="Phone" class="form-control" />
            </div>
        </div>
    </div>
    <h4>Supplier</h4>
    <div class="p-1 m-1">
        <div class="form-row">
            <div class="form-group col">
                <label asp-for="Supplier.Name" class="form-control-label"></label>
                <input asp-for="Supplier.Name" class="form-control" />
            </div>
            <div class="form-group col">
                <label asp-for="Supplier.City" class="form-control-label"></label>
                <input asp-for="Supplier.City" class="form-control" />
            </div>
            <div class="form-group col">
                <label asp-for="Supplier.State" class="form-control-label"></label>
                <input asp-for="Supplier.State" class="form-control" />
            </div>
        </div>
        @if (ViewBag.Suppliers != null)
        {
            @await Html.PartialAsync("RelationshipEditor", Model.SupplierId);
        }
    </div>
    <div class="text-center m-1">
        <button type="submit" class="btn btn-primary">Save</button>
        <a asp-action="Index" class="btn btn-secondary">Cancel</a>
    </div>
</form>
这个视图中最重要的元素是用户看不到的元素:隐藏元素,它将包含ConactDetails和Supplier对象的Id属性值。如果这些属性的值为 0,则将创建新对象;对于任何其他值,将更新现有对象。(此视图还引用了我将在下一节中创建的分部视图。)
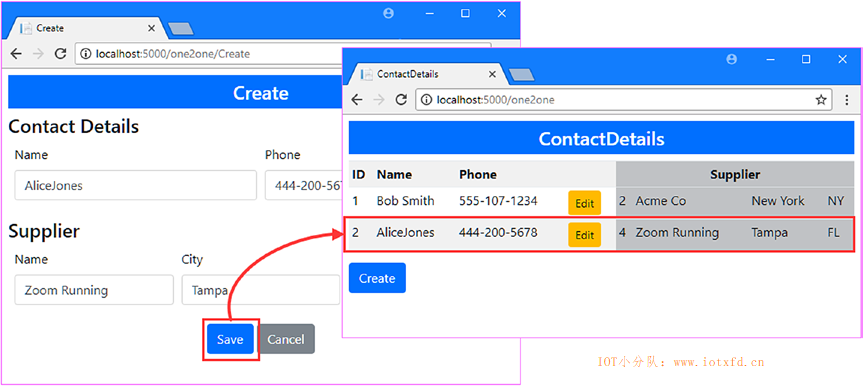
使用dotnet run启动应用程序,导航到 http://localhost:5000/one2one,并单击【Create】按钮。填写输入元素并单击【Save】按钮以创建新的ConactDetails和Supplier对象,然后将显示这些内容,如图16-3所示。
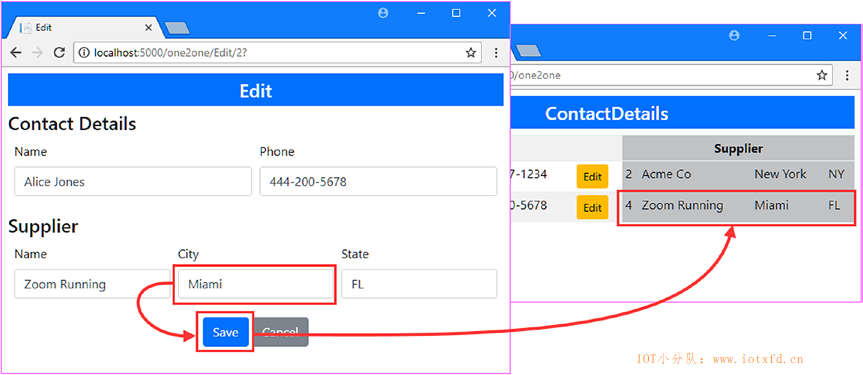
单击刚才创建的新对象的【Edit】按钮,并更改Supplier对象的Name字段的值。单击【Save】按钮时,Entity Framework Core 将遵循 MVC 模型绑定器创建的ConactDetails对象的导航属性,并使用它更新数据库,如图16-4所示。
在更改对象之间的关系时必须小心,特别对于必要关系。Entity Framework Core 在向数据库发送更新之前不强制执行对关系的限制,而且很容易执行违反数据库引用完整性的更新,从而产生错误。在接下来的部分中,我将向您展示如何更新必要关系和可选关系,从示例应用程序的数据库中已经配置的现有必要关系开始。
必要关系的挑战是,您必须避免存储与主要实体无关联的任何依赖实体。对于示例应用程序来说,这意味着ContactDetails对象必须与Supplier对象关联。试图存储或更新与Supplier无关联的ContactDetails对象将导致错误。
必要关系只在一个方向上应用;依赖实体必须与主要实体关联,但主要实体不必与依赖实体相关联。对于示例应用程序,这意味着Supplier对象可以在不与ContactDetails对象关联的情况下存在。这对应于如何在数据库中表示关系,其中外键列是在用于存储依赖实体的表上定义的,但主要实体的表根本不包含关系的信息。
这为更改对象的关系提供了两种不同的场景。第一种情况是,当您希望更改关系时,依赖实体将与当前不在关系中的主要实体相关联。对于示例应用程序,这意味着有独立(或“备用”)Supplier对象可用,其中一个与ConactDetails对象关联,取代了现有的Supplier。在此操作结束时,最初与ContactDetails对象其相关的Supplier成为备件之一。
第二个场景是当您想要创建一个已经与另一个对象关联的Supplier的关系时。您不能在不违反数据库约束的情况下将现有ConactDetails对象单独附加,因此必须与另一个Supplier创建关系,通常是通过执行交换。
为了增加对更改现有关系的支持,我对One2One控制器进行了清单16-10所示的更改
清单 16-10:Controllers 文件夹下的 One2OneController.cs 文件,更改关系
using DataApp.Models;
using Microsoft.AspNetCore.Mvc;
using Microsoft.EntityFrameworkCore;
using System.Linq;

namespace DataApp.Controllers
{
    public class One2OneController : Controller
    {
        private EFDatabaseContext context;
        public One2OneController(EFDatabaseContext ctx) => context = ctx;
        public IActionResult Index()
        {
            return View(context.Set<ContactDetails>().Include(cd => cd.Supplier));
        }
        public IActionResult Create() => View("ContactEditor");
        public IActionResult Edit(long id)
        {
            ViewBag.Suppliers = context.Suppliers.Include(s => s.Contact);
            return View("ContactEditor",
                context.Set<ContactDetails>()
                    .Include(cd => cd.Supplier).First(cd => cd.Id == id));
        }
        [HttpPost]
        public IActionResult Update(ContactDetails details)
        {
            if (details.Id == 0)
            {
                context.Add<ContactDetails>(details);
            }
            else
            {
                context.Update<ContactDetails>(details);
            }
            context.SaveChanges();
            return RedirectToAction(nameof(Index));
        }
    }
}
我将逐步构建这个功能,因为它可能会让人感到困惑。我目前所做的唯一改变就是创建一个ViewBag属性,该属性将为视图提供供应商数据。这将确保在用户编辑对象时,在输出中包含一个名为 RelationshipEditor.cshtml 的分部视图,这为我提供了一个可以与其建立关系的现有供应商对象列表的机会。我在 Views/One2One 文件夹中创建了一个名称为 RelationshipEditor.cshtml 的视图文件,并添加了清单16-11所示的内容。
清单 16-11:Views/One2One 文件夹下的 RelationshipEditor.cshtml 文件的内容
@model long

<div class="p-1 m-1">
    @foreach (Supplier s in ViewBag.Suppliers)
    {
        @if (s.Id != Model)
        {
            <div class="form-row">
                <div class="form-group col">
                    <input type="radio" name="targetSupplierId" value="@s.Id" />
                    @if (s.Contact == null)
                    {
                        <input type="hidden" name="spares" value="@s.Id" />
                    }
                </div>
                <div class="form-group col-1">
                    <label class="form-control-label">@s.Id</label>
                </div>
                <div class="form-group col">
                    <label class="form-control-label">@s.Name</label>
                </div>
                <div class="form-group col">
                    <label class="form-control-label">@s.City</label>
                </div>
                <div class="form-group col">
                    <label class="form-control-label">@s.State</label>
                </div>
                <div class="form-group col">
                    <label class="form-control-label">
                        @(s.Contact == null ? "(None)" : s.Contact.Name)
                    </label>
                </div>
            </div>
        }
    }
</div>
此分部视图枚举一系列Supplier对象,以向用户呈现列表,允许使用单选按钮选择供应商,该按钮包括将发送给应用程序的 HTTP POST 请求中的一个表单数据值,名为targetSupplierId。还有一个名为spares的值集合,它包含免费的Supplier对象的主键值,我将使用这些值来计算是否存在要更改的关系。
使用dotnet run启动应用程序,导航到 http://localhost:5000/one2one,然后单击显示的ConactDetails对象之一的【Edit】按钮。除了前面示例中的input元素之外,您还将看到Supplier对象的列表,不包括当前对象与之相关的那一个,如图16-5所示。
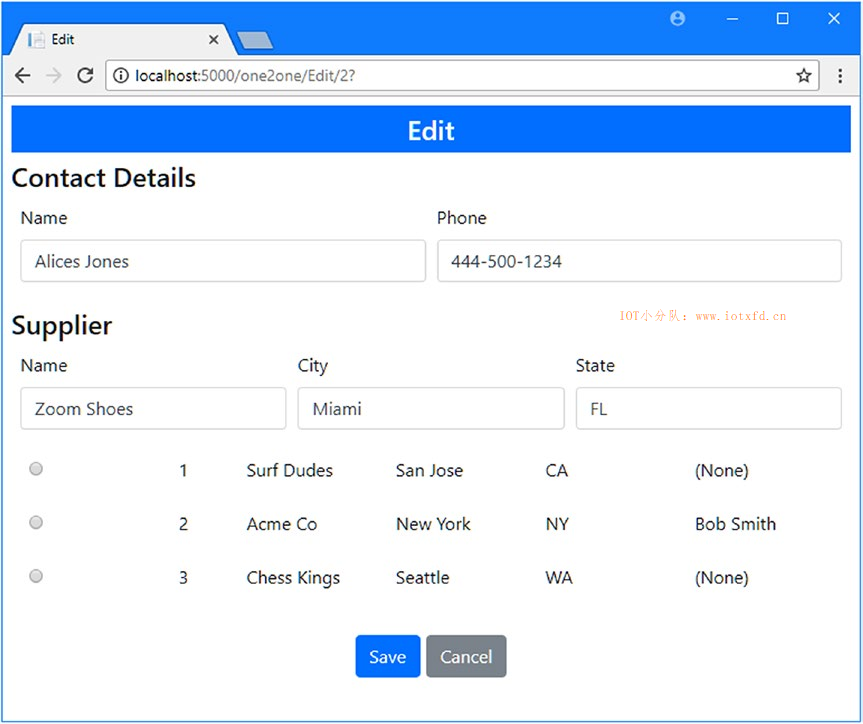
现在所有的准备工作都完成了,我可以添加将改变关系的代码。第一种情况是当用户选择当前与ConactDetails对象无关的Supplier对象时。这是一个很容易进行的更改,因为我所要做的就是将ConactDetails对象的SupplierId属性的值更改为“spares”供应商的主键。此更改将破坏与当前供应商的关系,并创建与新供应商的关系。清单16-12显示了控制器处理此类变更所需的更改。
清单 16-12:Controllers 文件夹下的 One2OneController.cs 文件,更改关系
...
[HttpPost]
public IActionResult Update(ContactDetails details,
    long? targetSupplierId, long[] spares)
{
    if (details.Id == 0)
    {
        context.Add<ContactDetails>(details);
    }
    else
    {
        context.Update<ContactDetails>(details);
        if (targetSupplierId.HasValue)
        {
            if (spares.Contains(targetSupplierId.Value))
            {
                details.SupplierId = targetSupplierId.Value;
            }
        }
    }
    context.SaveChanges();
    return RedirectToAction(nameof(Index));
}
...
当用户选择现有的某个Supplier对象时,新的targetSupplierId参数将具有一个值,而spares参数将包含不处于关系中的Supplier对象的主键值。action 方法中的新语句使用参数来查看用户是否选择了现有的备用供应商,如果选择了,则设置SupplierId属性以创建关系。
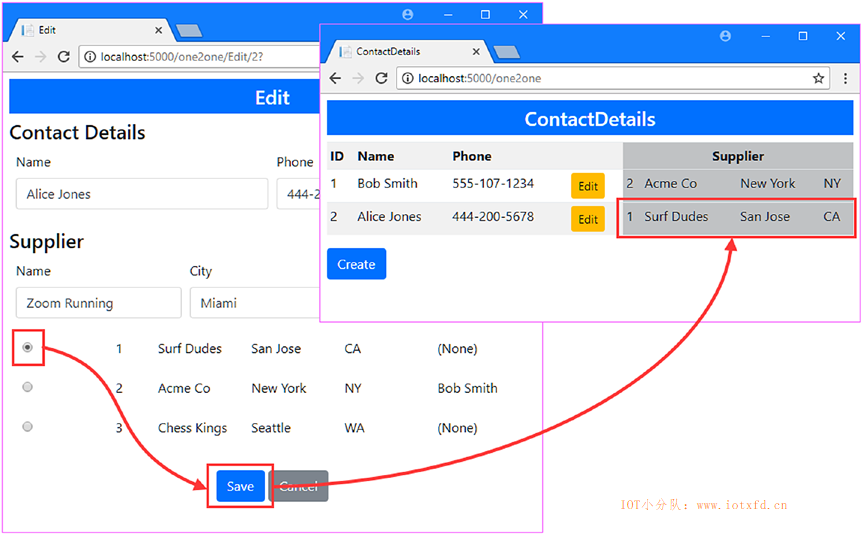
要查看这些代码的影响,重启应用程序,并导航至 http://localhost:5000/one2one。单击其中一个【Edit】按钮,并为最后一列显示的Supplier对象之一选择单选按钮,指示它是备用的。单击【Save】按钮,您将看到ConactDetails对象现在与您选择的供应商相关,如图16-6所示。
第二种情况是造成混乱的情况。当您想要与Supplier建立一种非备用的关系时,需要采取其他步骤来更新数据库,同时保持其引用完整性。在清单16-13中,我将语句添加到要处理此过程的Update action 方法中。
清单 16-13:Controllers 文件夹下的 One2OneController.cs 文件,更改现有关系
...
[HttpPost]
public IActionResult Update(ContactDetails details,
    long? targetSupplierId, long[] spares)
{
    if (details.Id == 0)
    {
        context.Add<ContactDetails>(details);
    }
    else
    {
        context.Update<ContactDetails>(details);
        if (targetSupplierId.HasValue)
        {
            if (spares.Contains(targetSupplierId.Value))
            {
                details.SupplierId = targetSupplierId.Value;
            }
            else
            {
                ContactDetails targetDetails = context.Set<ContactDetails>()
                    .FirstOrDefault(cd => cd.SupplierId == targetSupplierId);
                targetDetails.SupplierId = details.Supplier.Id;
                Supplier temp = new Supplier { Name = "temp" };
                details.Supplier = temp;
                context.SaveChanges();

                temp.Contact = null;
                details.SupplierId = targetSupplierId.Value;
                context.Suppliers.Remove(temp);
            }
        }
    }
    context.SaveChanges();
    return RedirectToAction(nameof(Index));
}
...
如果用户选择的供应商已经与ConactDetails对象相关,则必须进行洗牌。首先,我查询数据库中与用户想要的供应商关联的ConactDetails对象,并更改其SupplierId属性,使其与用户正在编辑的对象关联。(在本节结束时,我将介绍一个具体的示例,它将帮助您理解在这一系列更新中正在发生的事情。)
此时我无法更新数据库,因为两个ConactDetails对象与同一个供应商关联,这在数据库中是不允许的。而且,由于这是一个必要的一对一关系,我不能存储任何ConactDetails对象,除非它与供应商关联。
因此,下一步是创建一个新的Supplier对象,我将其分配给一个名为temp的变量,并使用它创建与正在编辑的ContactDetail对象的关系。此时,我调用SaveChanges方法来存储更改,并将在Suppliers表中为temp对象创建一个新行。
更新的结果是用户选择的Supplier对象是备用的,可供使用。我将其主键值分配给正在编辑的ConactDetails对象的SupplierId属性,告诉 Entity Framework Core 删除临时Supplier对象,然后再次调用SaveChanges方法。第二个更新从temp对象中删除该行,并创建用户请求的 ContactDetails/Supplier 关系。
提示:这种多级操作通常在事务中执行,以便在操作中的第二次更新因某种原因失败时,可以自动取消第一次更新所应用的更改。有关事务如何工作以及 Entity Framework Core 如何支持事务的详细信息,请参阅第24章。
要查看这些是如何工作的,请使用dotnet run重新启动应用程序,并导航至 http://localhost:5000/one2one,单击某一个【Edit】按钮。为已经与ConactDetails对象关联的供应商选择单选按钮,然后单击【Save】按钮。添加到清单16-13中的 action 方法中的新代码将更新数据库,以便交换ConactDetails和Supplier对象之间的关系,如图16-7所示。
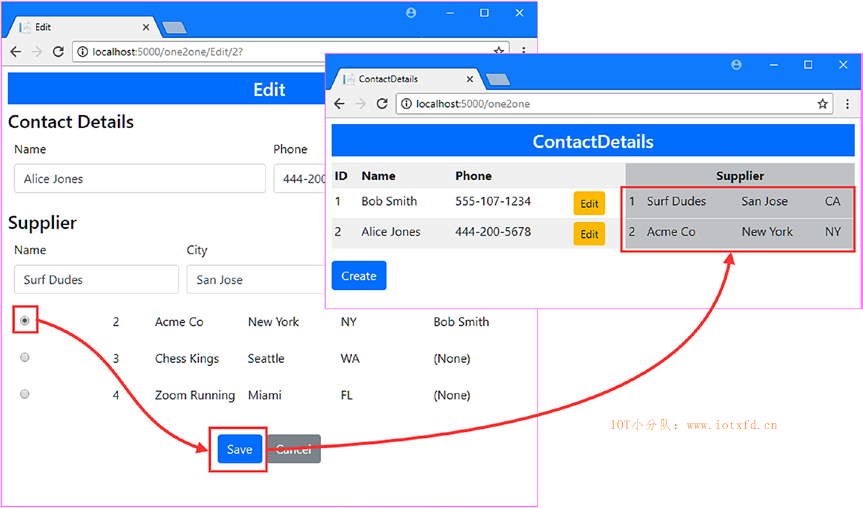
我选择了“Alice Jones” ContactDetails对象,它关联的是“Surf Dudes” 供应商,并告诉应用程序,希望转而与“Acme Co” 供应商关联。与“Acme Co” 供应商关联的是“Bob Smith” ContactDetails对象。下面是我为实现用户所需的更新而执行的操作:
SupplierId属性为“Surf Dudes”对象的Id值。Supplier对象,并将它赋予“Alice Jones”的Supplier属性。ContactDetails对象关联,从而成为备用的。Id值。Supplier对象。这是一个不可否认的尴尬过程——也是一个造成许多混乱的过程——但是它确保数据库中的约束得到遵守,并且避免了来自数据库服务器的任何错误。
当您处理可选的一对一关系时,这个过程更简单,因为您不必担心确保每个ConactDetails对象都与供应商对象关联,只需避免重复外键值。将外键属性的类型更改为可以设置为null的类型将必要关系更改为可选关系。在清单16-14中,我已经更改了ConactDetails导航属性定义的外部 ley 属性的类型。
清单 16-14:Models 文件夹下的 ContactDetails.cs 文件,更改属性类型
namespace DataApp.Models
{
    public class ContactDetails
    {
        public long Id { get; set; }
        public string Name { get; set; }
        public string Phone { get; set; }
        public ContactLocation Location { get; set; }
        public long? SupplierId { get; set; }
        public Supplier Supplier { get; set; }
    }
}
在 DataApp 项目文件夹中运行清单16-15所示的命令,更新数据库以反映关系的变化。(数据库不需要删除和重新创建,因为更改放松了数据库中的限制。)
清单 16-15:创建并应用迁移
dotnet ef migrations add OptionalOneToOne --context EFDatabaseContext
dotnet ef database update --context EFDatabaseContext
现在关系变为可选的了,我可以简化控制器的Update方法中的代码,如清单16-16所示。
清单 16-16:Controllers 文件夹下的 One2OneController.cs 文件,简化 Updata 方法
...
[HttpPost]
public IActionResult Update(ContactDetails details,
    long? targetSupplierId, long[] spares)
{
    if (details.Id == 0)
    {
        context.Add<ContactDetails>(details);
    }
    else
    {
        context.Update<ContactDetails>(details);
        if (targetSupplierId.HasValue)
        {
            if (spares.Contains(targetSupplierId.Value))
            {
                details.SupplierId = targetSupplierId.Value;
            }
            else
            {
                ContactDetails targetDetails = context.Set<ContactDetails>()
                    .FirstOrDefault(cd => cd.SupplierId == targetSupplierId);
                targetDetails.SupplierId = null;
                details.SupplierId = targetSupplierId.Value;
                context.SaveChanges();
            }
        }
    }
    context.SaveChanges();
    return RedirectToAction(nameof(Index));
}
...
交换关联对象不再是必需的,因为现在可以将ContactDetails存储在数据库中,而不需要与供应商对象建立关系。当用户选择一个供应商时,我将查询数据库以查找与其关联的ConactDetails对象,并将其SupplierId属性设置为null。这是一个重要的步骤,因为SupplierId值仍然必须是唯一的,并且两个ConactDetails对象不能与同一个供应商关联。
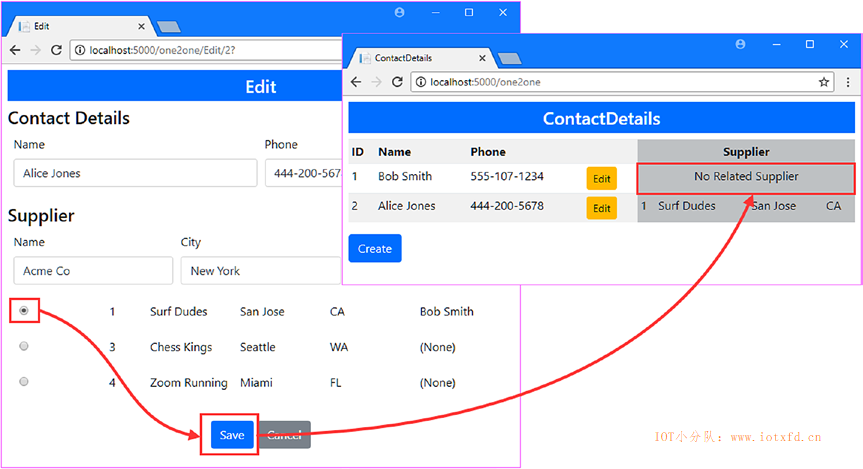
要查看效果,请重新启动应用程序,重复编辑过程,并选择已经与ConactDetails对象相关的供应商。单击【Save】按钮时,您将看到旧的关系已经中断,ConactDetails对象显示为不关联,如图16-8所示。
Entity Framework Core 可用于创建并管理多对多关系,一个类型的每个对象都可以无限制地与其它类型的多个对象产生关系。有些应用程序只能通过一对一和一对多的关系来解决问题,所以接下来的部分将演示如何定义和使用多对多的关系,尽管 Entity Framework Core 支持这样做是很尴尬的。
为了准备这个示例,我在 Models 文件夹中添加了一个名为 Shipment.cs 的类文件,并使用它来定义清单16-17所示的类。这个类将是多到多关系的参与者之一。
清单 16-17:Models 文件夹下的 Shipment.cs 文件的内容
namespace DataApp.Models
{
    public class Shipment
    {
        public long Id { get; set; }
        public string ShipperName { get; set; }
        public string StartCity { get; set; }
        public string EndCity { get; set; }
    }
}
Shipment类代表一批产品。为了跟踪哪些产品已经发货,我将它与Product类创建一个多到多的关系。这意味着一个Product对象可以与多个Shipment对象关联(指示产品在多个装运中交付),一个Shipment对象可以与多个Product对象关联(指示一批货物可以包含多个产品)。
Entity Framework Core 能通过组合两个一对多的关系并使用一个连接类将它们连接在一起来表示多对多的关系。如果这没有直接意义的话,不必担心,因为当你看到不同的部分是如何组合在一起的时候,它会变得越来越清晰。
要创建连接类,我在 Models 文件夹下新建了一个名为 ProductShipmentJunction.cs 的类文件,并使用它定义了清单 16-18 所示的类。
清单 16-18:Models 文件夹下的 ProductShipmentJunction.cs 文件的内容
namespace DataApp.Models
{
    public class ProductShipmentJunction
    {
        public long Id { get; set; }
        public long ProductId { get; set; }
        public Product Product { get; set; }
        public long ShipmentId { get; set; }
        public Shipment Shipment { get; set; }
    }
}
连接类的唯一目的是充当两个一对多关系的容器。ProductShipmentJunction类定义了两组导航和外键属性,它们创建了Product与Shipment类的关系,并且是这两种关系中的依赖实体。
完全关系意味着向Product和Supplier类添加导航属性,以完成单个的一对多关系,并允许通过连接类从一个类导航到另一个类。在清单16-19中,我将导航属性添加到Product类中。
清单 16-19:Models 文件夹下的 Product.cs 文件,添加导航属性
using System.Collections.Generic;

namespace DataApp.Models
{
    public enum Colors
    {
        Red, Green, Blue
    }
    public class Product
    {
        public long Id { get; set; }
        public string Name { get; set; }
        public string Category { get; set; }
        public decimal Price { get; set; }
        public Colors Color { get; set; }
        public bool InStock { get; set; }
        public long SupplierId { get; set; }
        public Supplier Supplier { get; set; }
        public IEnumerable<ProductShipmentJunction> ProductShipments { get; set; }
    }
}
新的导航属性完成与连接类而不是Shipment类的关系。在清单16-20中,我将相应的属性添加到Shipment类中,从而完成了与连接类的关系。
清单 16-20:Models 文件夹下的 Shipment.cs 文件,添加导航属性
using System.Collections.Generic;

namespace DataApp.Models
{
    public class Shipment
    {
        public long Id { get; set; }
        public string ShipperName { get; set; }
        public string StartCity { get; set; }
        public string EndCity { get; set; }
        public IEnumerable<ProductShipmentJunction> ProductShipments { get; set; }
    }
}
这两个实体类都定义了导航属性,这些属性返回IEnumerable<ProductShipmentJunction>,并且彼此之间没有直接关系。这使得导航和数据操作更加复杂,但确实建立在一个熟悉的基础上,以提供多对多的特性,您将在下面的章节中看到这一点。
在 DataApp 项目文件夹中运行清单16-21所示的命令,创建一个更新数据库的迁移,以便它能够存储Shipment对象并表示多对多的关系。
清单 16-21:创建迁移
dotnet ef migrations add ManyToMany --context EFDatabaseContext
如果您检查 Migrations 文件中创建的<timestamp>_ManyToMany.cs文件的Up方法,将看到新添加了两张表。 Entity Framework Core 已经检测到Product类上的新导航属性,并确定它需要存储ProductShipmentJunction和Shipment对象。ProductShipmentJunction类是其两个关系中的依赖实体,该表是 Entity Framework Core 向其添加外键列的表,这些列将用于表示与Product和Supplier类的关系。其结果是ProductShipmentJunction类和Product类之间的一对多关系,以及ProductShipmentJunction类和Shipment类之间的一对多关系,如图16-9所示。
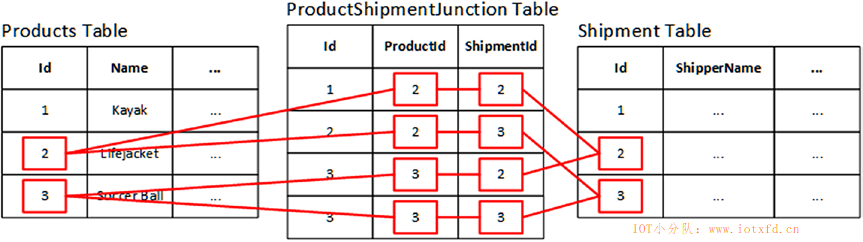
每个ProductShipmentJunction对象都作为Product和Shipment对象的连接,导航属性返回的ProductShipmentJunction对象集合将提供对完整的关联对象集的访问,尽管这是间接的,正如您将在下面的部分中看到的那样。
为有数据可用,我向种子数据类添加了一些Shipment对象,如清单6-22所示。不存在由新对象创建的关系,当它们存储在数据库中时,它们将独立存在。我将向您展示如何创建和管理这些关系。
清单 16-22:Models 文件夹下的 SeedData.cs 文件,添加数据
using Microsoft.EntityFrameworkCore;
using System.Linq;

namespace DataApp.Models
{
    public static class SeedData
    {
        public static void Seed(DbContext context)
        {
            if (context.Database.GetPendingMigrations().Count() == 0)
            {
                if (context is EFDatabaseContext prodCtx
                    && prodCtx.Products.Count() == 0)
                {
                    prodCtx.Products.AddRange(Products);
                    prodCtx.Set<Shipment>().AddRange(Shipments);
                }
                else if (context is EFCustomerContext custCtx
                    && custCtx.Customers.Count() == 0)
                {
                    custCtx.Customers.AddRange(Customers);
                }
                context.SaveChanges();
            }
        }

        public static void ClearData(DbContext context)
        {
            if (context is EFDatabaseContext prodCtx
                && prodCtx.Products.Count() > 0)
            {
                prodCtx.Products.RemoveRange(prodCtx.Products);
                prodCtx.Set<Shipment>().RemoveRange(prodCtx.Set<Shipment>());
            }
            else if (context is EFCustomerContext custCtx
                && custCtx.Customers.Count() > 0)
            {
                custCtx.Customers.RemoveRange(custCtx.Customers);
            }
            context.SaveChanges();
        }

        public static Shipment[] Shipments
        {
            get
            {
                return new Shipment[] {
                    new Shipment { ShipperName = "Express Co",
                        StartCity = "New York", EndCity = "San Jose"},
                    new Shipment { ShipperName = "Tortoise Shipping",
                        StartCity = "Boston", EndCity = "Chicago"},
                    new Shipment { ShipperName = "Air Express",
                        StartCity = "Miami", EndCity = "Seattle"}
                    };
            }
        }

        private static Product[] Products
        {
            get
            {
               // ...此处省略...
            }
        }

        private static Customer[] Customers =
        {
            new Customer { Name = "Alice Smith",
                City = "New York", Country = "USA" },
            new Customer { Name = "Bob Jones",
                City = "Paris", Country = "France" },
            new Customer { Name = "Charlie Davies",
                City = "London", Country = "UK" }
        };
    }
}
新的Shipments属性返回一个Shipment对象数组,它会在Seed方法中被Set<T>.AddRange方法添加到数据库。ClearData方法也已被更新,以从数据库中删除Shipment对象,同时也使用Set<T>特性。
种子数据将只应用于一个空数据库,因此在 DataApp 文件夹中运行清单16-23中所示的命令,删除并重新创建包含所有迁移的数据库,包括在清单16-22中创建的数据库,它增加了对多对多关系的支持。
清单 16-23:删除并重建数据库
dotnet ef database drop --force --context EFDatabaseContext
dotnet ef database update --context EFDatabaseContext
多对多关系所需的方法对执行查询的方式有影响。在编写查询一对一数据库的代码时要小心,因为很容易只关注对应用程序很重要的类,而忘记连接类的角色。
为了创建一个基本查询,我在 Controllers 文件夹中添加了一个名为 Many2ManyController.cs 的类文件,并使用它来定义如清单16-24所示的控制器。
清单 16-24:Controllers 文件夹下的 Many2ManyController.cs 文件的内容
using DataApp.Models;
using Microsoft.AspNetCore.Mvc;
using Microsoft.EntityFrameworkCore;
using System.Collections.Generic;
using System.Linq;
namespace DataApp.Controllers
{
    public class Many2ManyController : Controller
    {
        private EFDatabaseContext context;
        public Many2ManyController(EFDatabaseContext ctx) => context = ctx;
        public IActionResult Index()
        {
            return View(new ProductShipmentViewModel
            {
                Products = context.Products.Include(p => p.ProductShipments)
                    .ThenInclude(ps => ps.Shipment).ToArray(),
                Shipments = context.Set<Shipment>().Include(s => s.ProductShipments)
                    .ThenInclude(ps => ps.Product).ToArray()
            });
        }
    }
    public class ProductShipmentViewModel
    {
        public IEnumerable<Product> Products { get; set; }
        public IEnumerable<Shipment> Shipments { get; set; }
    }
}
Many2Many控制器定义了一个Index action 方法,它将ProductShipmentViewModel对象传递给默认视图。ProductShipmentViewModel类允许我以一致的方式将Product和Shipment数据传递给视图。
Index action 中的查询语句使用数据填充视图模型对象的属性,使用Product对象的自定义 context 属性和Set<T>方法来查询Shipment数据。在这两种情况下,Include方法都用于跟踪连接类的导航属性,然后将ThenInclude用于包含关系中的其他类型。
当要在这种关系中显示关联数据时,必须考虑连接类。为了给清单16-24中定义的Index action 提供视图,我创建了 Views/Many2Many 文件夹,并向其添加了一个名为 Index.cshtml 的 Razor 文件,内容如清单16-25所示。
清单 16-25:Views/Many2Many 文件夹下的 Index.cshtml 文件的内容
@model DataApp.Controllers.ProductShipmentViewModel
@{
    ViewData["Title"] = "Many To Many";
    Layout = "_Layout";
}

<h4>Shipments</h4>
<table class="table table-sm table-striped">
    <tr><th>ID</th><th>Name</th><th>Product Names</th><th></th></tr>
    @if (Model.Shipments?.Count() > 0)
    {
        @foreach (Shipment s in Model.Shipments)
        {
            <tr>
                <td>@s.Id</td>
                <td>@s.ShipperName</td>
                <td>
                    @(string.Join(", ", s.ProductShipments
                    .Select(ps => ps.Product.Name)))
                </td>
                <td>
                    <a asp-action="EditShipment" asp-route-id="@s.Id"
                       class="btn btn-sm btn-primary">Edit</a>
                </td>
            </tr>
        }
    }
    else
    {
        <tr><td colspan="3" class="text-center">No Data</td></tr>
    }
</table>
<h4>Products</h4>
<table class="table table-sm table-striped">
    <tr><th>ID</th><th>Name</th><th>Shipment Names</th></tr>
    @if (Model.Products?.Count() > 0)
    {
        @foreach (Product p in Model.Products)
        {
            <tr>
                <td>@p.Id</td>
                <td>@p.Name</td>
                <td colspan="2">
                    @(string.Join(", ", p.ProductShipments
                    .Select(ps => ps.Shipment.ShipperName)))
                </td>
            </tr>
        }
    }
    else
    {
        <tr><td colspan="3" class="text-center">No Data</td></tr>
    }
</table>
该视图显示包含Product和Shipment对象详细信息的表,以及我将在本章后面添加的目标 action 的链接,以演示如何更改关系。每个表行都使用导航属性通过连接类来获取关联对象的集合,然后使用 LINQ 和string.Join方法来处理这些对象,以创建一个名称数组。
提示:视图不止一次地评估数据对象的序列,这就是为什么我在清单16-25中的查询中使用
ToArray方法(如第15章所述),以防止重复的查询被发送到数据库。
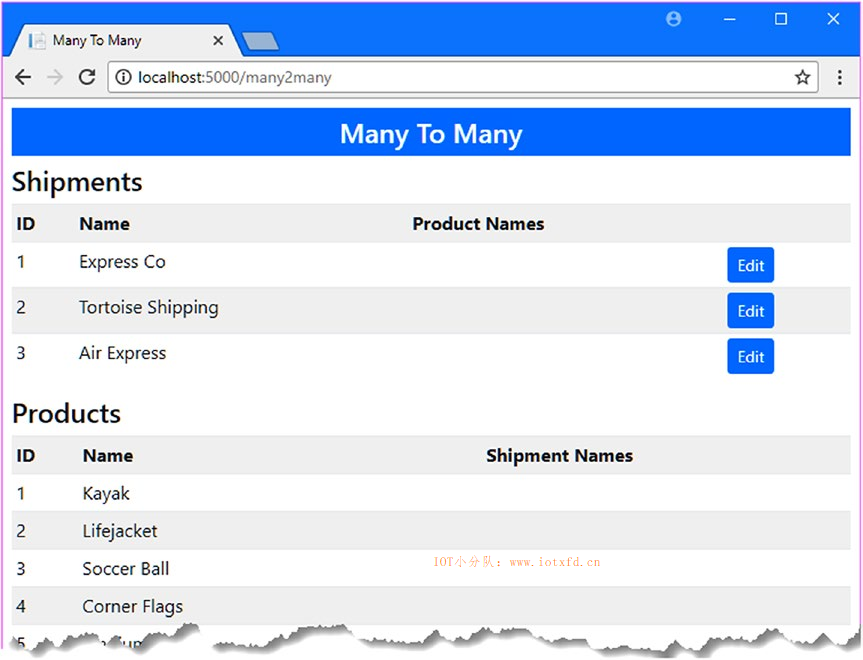
使用dotnet run启动应用程序,并导航到 http://localhost:5000/many2many。数据将在启动期间使用清单16-25中的数据进行播种,但现在还没有多对多关系,其结果如图16-10所示。
为了增加对管理关系的支持,我将清单16-26所示的 action 方法添加到了Many2Many控制器中。action 方法查询数据库中用户选择的对象,并将其传递到名为 ShipmentEditor 的视图。
清单 16-26:Controllers 文件夹下的 Many2ManyController.cs 文件,添加 action
using DataApp.Models;
using Microsoft.AspNetCore.Mvc;
using Microsoft.EntityFrameworkCore;
using System.Collections.Generic;
using System.Linq;
namespace DataApp.Controllers
{
    public class Many2ManyController : Controller
    {
        private EFDatabaseContext context;
        public Many2ManyController(EFDatabaseContext ctx) => context = ctx;
        public IActionResult Index()
        {
            return View(new ProductShipmentViewModel
            {
                Products = context.Products.Include(p => p.ProductShipments)
                    .ThenInclude(ps => ps.Shipment).ToArray(),
                Shipments = context.Set<Shipment>().Include(s => s.ProductShipments)
                    .ThenInclude(ps => ps.Product).ToArray()
            });
        }

        public IActionResult EditShipment(long id)
        {
            ViewBag.Products = context.Products.Include(p => p.ProductShipments);
            return View("ShipmentEditor", context.Set<Shipment>().Find(id));
        }
    }
    public class ProductShipmentViewModel
    {
        public IEnumerable<Product> Products { get; set; }
        public IEnumerable<Shipment> Shipments { get; set; }
    }
}
为了允许用户编辑Shipment对象的关系,我需要对象本身和Product对象的完整集合,这样我就可以显示哪些是当前关联的,哪些不是关联的,这意味着我还需要获得ProductShipmentJunction对象。我使用Include方法在单个查询中获取Product和ProductShipmentJunction对象,并将结果分配给ViewBag.Products属性,该属性提供对产品的访问,以及确定它们是否与用户选择的Shipment关联的方法。对于Shipment对象本身,我使用数据库 context 对象Set<T>方法的Find方法查询数据库,并将Shipment对象作为模型传递给视图方法。
为给 action 方法提供视图,我在 Views/Many2Many 文件夹下新建了一个名为 ShipmentEditor.cshtml 的视图,并添加清单16-27所示的内容。
清单 16-27:Views/Many2Many 文件夹下的 ShipmentEditor.cshtml 的内容
@model DataApp.Models.Shipment
@{
    ViewData["Title"] = "Many To Many";
    Layout = "_Layout";
}
<div class="m-1 p-1">
    <div class="row">
        <div class="col"><strong>Name</strong></div>
        <div class="col"><strong>Start</strong></div>
        <div class="col"><strong>End</strong></div>
    </div>
    <div class="row">
        <div class="col">@Model.ShipperName</div>
        <div class="col">@Model.StartCity</div>
        <div class="col">@Model.EndCity</div>
    </div>
</div>
<form asp-action="UpdateShipment" method="post" class="p-2">
    <input type="hidden" name="id" value="@Model.Id" />
    <h4>Products</h4>
    @foreach (Product p in ViewBag.Products)
    {
        <div class="form-row">
            <div class="form-group col-1">
                @if (p.ProductShipments.Any(ps => ps.ShipmentId == Model.Id))
                {
                    <input type="checkbox" name="pids" value="@p.Id" checked />
                }
                else
                {
                    <input type="checkbox" name="pids" value="@p.Id" />
                }
            </div>
            <div class="form-group col">
                <label class="form-control-label">@p.Name</label>
            </div>
            <div class="form-group col">
                <label class="form-control-label">@p.Category</label>
            </div>
            <div class="form-group col">
                <label class="form-control-label">@p.Price.ToString("C2")</label>
            </div>
        </div>
    }
    <div class="text-center">
        <button class="btn btn-primary" type="submit">Save</button>
        <a asp-action="Index" class="btn btn-secondary">Cancel</a>
    </div>
</form>
Shipment对象用于向用户显示属性值,并为表单中的隐藏input元素提供值。Product对象的集合用于显示详细信息表格,其中ProductShipmentJunction对象用于确定Product是否与Shipment模型对象关联。
当用户单击视图显示的【Save】按钮时,HTML 表单将被发送到一个名为UpdateShipment的 action 中。在清单16-28中,我将 action 方法添加到Many2Many控制器中,以及更新数据库以反映用户选择的关系所需的代码。
注意:清单16-28中的代码只更新多对多的关系,不更新
Shipment对象的任何其他方面。有关在单个 action 方法中更新对象及其多对多关系的演示,请参见第18章。
清单 16-28:Controllers 文件夹下的 Many2ManyController.cs 文件,更新关系
using DataApp.Models;
using Microsoft.AspNetCore.Mvc;
using Microsoft.EntityFrameworkCore;
using System.Collections.Generic;
using System.Linq;
namespace DataApp.Controllers
{
    public class Many2ManyController : Controller
    {
        private EFDatabaseContext context;
        public Many2ManyController(EFDatabaseContext ctx) => context = ctx;
        public IActionResult Index()
        {
            return View(new ProductShipmentViewModel
            {
                Products = context.Products.Include(p => p.ProductShipments)
                    .ThenInclude(ps => ps.Shipment).ToArray(),
                Shipments = context.Set<Shipment>().Include(s => s.ProductShipments)
                    .ThenInclude(ps => ps.Product).ToArray()
            });
        }

        public IActionResult EditShipment(long id)
        {
            ViewBag.Products = context.Products.Include(p => p.ProductShipments);
            return View("ShipmentEditor", context.Set<Shipment>().Find(id));
        }

        public IActionResult UpdateShipment(long id, long[] pids)
        {
            Shipment shipment = context.Set<Shipment>()
            .Include(s => s.ProductShipments).First(s => s.Id == id);
            shipment.ProductShipments = pids.Select(pid
            => new ProductShipmentJunction
            {
                ShipmentId = id,
                ProductId = pid
            }).ToList();
            context.SaveChanges();
            return RedirectToAction(nameof(Index));
        }
    }
    public class ProductShipmentViewModel
    {
        public IEnumerable<Product> Products { get; set; }
        public IEnumerable<Shipment> Shipments { get; set; }
    }
}
新的 action 方法接收用户编辑的Shipment对象的Id值和需要关联的Product对象的Id值数组。
更新关系的第一步是查询数据库以获得Shipment对象及其关联的连接对象。这是一个重要的步骤,因为如果不从数据库中检索连接对象,Entity Framework Core 就不会删除任何不再需要的现有关系。
警告:如果不查询现有关系,则会发现新的关系将添加到数据库中,但用户取消选择的关系将保持不变。
下一步是将连接对象的集合替换为仅包含用户选择的关系的对象,如下所示:
...
shipment.ProductShipments = pids.Select(pid =>
    new ProductShipmentJunction { ShipmentId = id, ProductId = pid }).ToList();
...
LINQ Select方法用于投影一系列ProductShipmentJunction对象,这些对象的外键属性被设置为表示用户选择的关系之一。(创建可变长度集合需要使用ToList方法,这就是 Entity Framework Core 希望使用的对象。)
不需要任何明确的操作来删除不再需要的现有关系。当调用SaveChanges方法时,Entity Framework Core 将使用由 action 方法创建的连接对象集合来更新数据库,根据需要创建和删除数据。
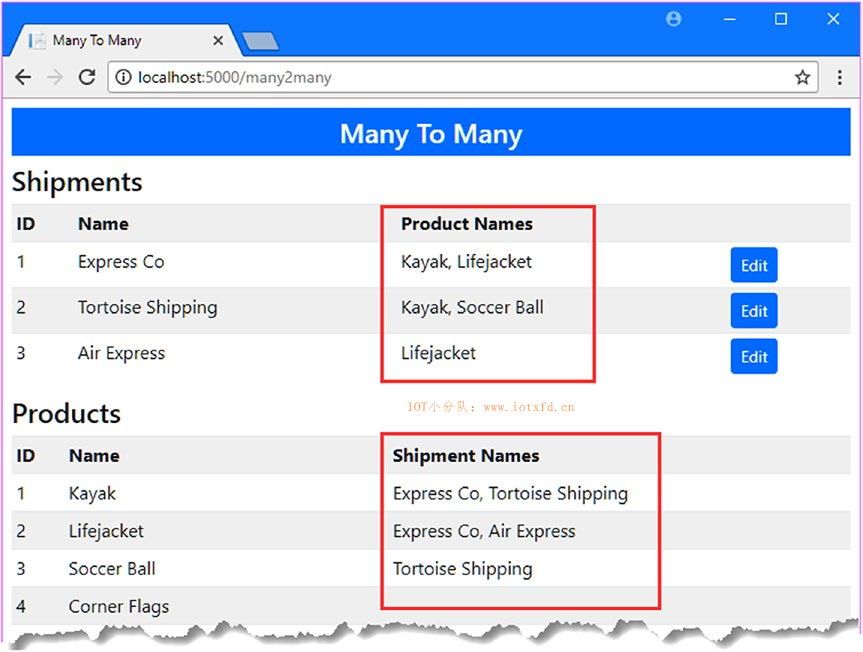
要查看结果,请重新启动应用程序,导航到 http://localhost:5000/many2many,,并单击其中某一批货物的【Edit】按钮。检查为必要关系的Product对象,然后单击【Save】按钮。您将看到,这些关系反映在列表的Shipments和Products部分中,并且每个对象都可以与多个其他对象相关,如图16-11所示。
在本章中,我解释了 Entity Framework Core 如何支持一对一和多对多关系。我向您展示了如何定义这些关系,如何对关联数据执行查询,以及如何代表用户更新这些关系。在下一章中,我将向您展示如何在现有数据库中使用 Entity Framework Core。
;